Key Takeaways
- Interior Painting: Best done in winter when the air is dry, and contractors are less busy. Prep the surfaces, invest in quality supplies, and start from the top.
- Exterior Painting: Ideal in spring or early fall when temperatures are mild. Prepare the surface thoroughly to ensure lasting results.
- Contractor Discounts: Hiring contractors in their off-season (typically winter) can save you money.
- Reuse Supplies: Save time and reduce waste by properly storing brushes and rollers between uses.
When is the Best Time to Paint Your House? A Complete Guide
Painting your home can add color, character, and new life to its walls. It’s also essential to home maintenance, protecting wood, metal, and other surfaces. While you can paint your home’s interior any time of the year, painting the exterior requires more consideration due to weather conditions. Understanding the best time to paint and following the proper techniques ensures your home will look great and last longer.
When Did You Last Paint Your House?
Maintaining your home’s appearance and integrity requires regular painting. Ideally, the interior of your home should be painted every five to ten years, depending on the room. High-traffic areas, such as playrooms and hallways, may need to be repainted every five years, while bedrooms and low-traffic regions can wait up to ten years between coats.
Exterior paint, on the other hand, needs more frequent attention. Factors like general wear and tear, weather conditions, and even lead-based paints (commonly used in homes built before 1978) can influence when to paint. If your home’s exterior paint shows signs of fading, cracking, or peeling, it may be time to refresh it.
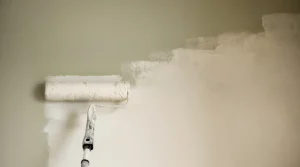
Why Winter Is Ideal for Interior Painting
Contrary to popular belief, winter can be an excellent time for interior home improvements, including painting. Construction, roadwork, and painting jobs typically slow down when temperatures drop. However, the dry and cool winter air inside your home can help paint dry more evenly and quickly. Many professionals even recommend winter as the best time for interior painting because the dry air minimizes moisture, allowing for a smooth, even finish.
For the best results, ensure the air, wall, and paint are all between 60 to 80 degrees Fahrenheit when painting. If you have been thinking of sprucing up your home’s interior, pick up some painting supplies and tackle the job before the warm weather arrives.
Tips for Interior Painting Success
Whether you’re doing the painting yourself or hiring a professional, following these essential tips will help ensure you achieve a flawless finish.
1. Compare Price and Performance
Before deciding whether to DIY or hire a professional, compare the prices and performance of different paints and contractors. Many contractors experience a slower season during winter, meaning you might find better deals.
When obtaining quotes, ask about the type of paint they plan to use, as quality can vary widely. Contractor-grade paints are typically the most affordable but may not offer the durability or coverage of higher-grade options. Popular paint brands such as Behr, Benjamin Moore, Sherwin-Williams, and Valspar provide different performance levels, from contractor-grade to premium-quality paints.
Consumer Reports suggests choosing a paint that scores “Very Good” or “Excellent” for interior painting regarding coverage and durability. Don’t skimp on quality; good paint will save you time and money in the long run.
Pro Tip: Consider scheduling any home improvement project, including painting, during the off-season to save money. Contractors are more likely to offer discounts during winter when business is slower.
2. Prep Your Walls Before Painting
Before painting, make sure the surfaces you’re working on are clean. Dust, grime, and even oils from your hands can prevent paint from adhering correctly. Use a tack cloth to wipe down walls, baseboards, and trims. Tack cloths are cheesecloths treated with a sticky substance (like beeswax) to capture dust and lint without spreading it around.
Pro Tip: Proper surface preparation is crucial for a professional finish. Skipping this step can lead to bubbles, peeling, or uneven paint coverage, causing you to waste time and money.
3. Invest in High-Quality Painting Supplies
You often get what you pay for when it comes to painting supplies. Cheap brushes and rollers might leave lint or streaks, requiring more work and possibly a redo. High-quality supplies will ensure a smoother, more even application and prevent frustrations.
Foam rollers are an excellent option for smooth surfaces, and investing in a good-quality brush can make a world of difference when cutting in around corners and edges. Read reviews or consult with paint specialists at your local store to choose the best brushes, rollers, and paint for your project.
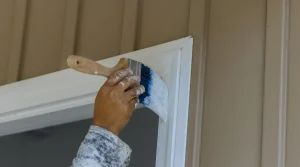
4. Start From the Top and Work Your Way Down
When painting a room, always start with the ceiling before moving to the walls. If you paint the walls first, you risk splattering ceiling paint onto your freshly painted walls. If you have crown molding, handle that next, followed by the walls, windows, doors, and trim.
Use a bucket for your paint rather than a can for the best results. This minimizes the risk of tipping over the paint and allows easier paint access for your roller.
5. Extend the Life of Your Painting Supplies
If your painting project takes more than one day, you don’t need to buy new brushes and rollers. Preserve your tools by placing them in airtight bags. You can store them at room temperature for a few hours or overnight by putting them in the refrigerator. Just allow them to return to room temperature before using them again.
Reusing your brushes and rollers saves both time and money and reduces waste.
Exterior Painting: Best Time and Tips
When it comes to painting the exterior of your house, weather conditions play a crucial role. Unlike indoor painting, where you control the environment, exterior painting must be timed with the seasons to avoid complications like rain, extreme temperatures, or high humidity.
Ideal Conditions for Exterior Painting
- Spring and Early Fall: These are generally the best seasons for exterior painting. The weather is typically mild, with less risk of rain, extreme heat, or cold that could ruin your paint job.
- Temperature Range: Exterior painting should be done when the temperature is between 50 and 90 degrees Fahrenheit. Anything lower or higher can prevent the paint’s adhering properly, leading to cracking or peeling.
- Avoid Humidity: High humidity levels can slow drying time and cause paint to bubble.
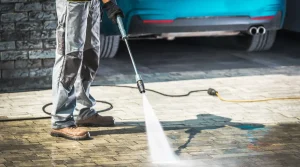
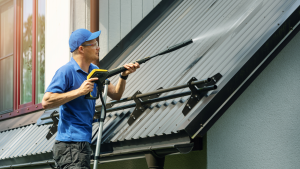
Preparing Your Home for Exterior Painting
Preparation is just as crucial for exterior painting as interior painting. Make sure to:
- Power wash the surface to remove dirt, mold, and debris.
- Scrape off any loose or peeling paint to create a smooth surface for the new paint.
- Repair damaged siding or trim before painting.
- Apply a high-quality primer to ensure the paint adheres properly and lasts longer.
Pro Tip: Choose paint designed for exterior use that offers UV protection and resists mildew, moisture, and weather-related wear.
FAQs
1. Can I paint my house in the winter?
Yes, you can paint the interior of your house during winter, and it’s often recommended. The dry air helps paint dry faster and more evenly. However, exterior painting should be avoided in cold or wet conditions.
2. How often should I repaint the interior of my home?
High-traffic areas like hallways and playrooms should be repainted every five years, while bedrooms and low-traffic spaces can go up to ten years.
3. What’s the best temperature for exterior painting?
The ideal temperature range for exterior painting is between 50 and 90 degrees Fahrenheit.
4. How can I save on printing costs?
Hiring a contractor during their off-season (winter) can save you money. Additionally, comparing paint quality and performance helps avoid overspending on unnecessary materials.
5. Do I need to clean my walls before painting?
Yes, cleaning your walls before painting removes dust, dirt, and oils, helping the paint adhere properly and providing a smooth finish.
6. Can I reuse paint rollers and brushes?
You can store them in airtight bags at room temperature for a few hours or overnight in the refrigerator if you resume painting the next day.
By following these tips and guidelines, you can ensure your painting project succeeds, and your home looks great for years.
Transform Your Home with Professional Painting Services in New City!
Looking to refresh your home’s look? Our skilled house painters in New City are here to bring your vision to life. Whether it’s interior or exterior, we provide top-notch quality, attention to detail, and lasting results. Let’s make your home stand out! Contact us today for a FREE estimate and take the first step towards a beautifully painted home.